With gray skies outside and only a few days of sunshine peeking through every so often, it’s been a couple of weeks for stews, soups, and chili. Since everyone seems to have their favorite winning chili cook-off recipe, I’m starting out with cornbread, since for me, chili without cornbread is like a hamburger without a bun, apple pie without vanilla ice cream, cereal without milk; it just won’t do.
I’ve tried a variety of cornbread recipes ranging from the one on the cornmeal package to the recipes from several books, and it’s one of the simplest breads to make. There are no critical times for resting dough, babying yeast, and too-early opening of the oven door, and therefore, perfect for me. Cornbread’s straightforward ingredients and process make it generally foolproof. Its simplicity has provided the perfect jumping off point for experimentation, especially when I’m missing an ingredient or two. One day I ran out of all purpose flour and substituted some whole wheat flour and a little more corn meal. No problem! It tasted great, and we enjoyed more rustic-looking bread, as the color was earthier, instead of the usual bright yellow.
Another time I ran out of sugar, and I used honey instead to another successful result, of course, with the distinctive flavor of honey. I’ve been curious to make it with fresh corn kernels, but haven’t since Jan has voted against it—that may go over OK at Sweet Tomatoes, but he wants his cornbread smooth.
My current recipe is a result of several experiments, with the understanding that there will be more experimentation in the future, depending on what my pantry may be missing that day.
Ever since I made the German chocolate cupcakes for our Noktoberfest party (see post Lederhosen and Lebkuchen), I’ve had an abundance of sweetened shredded coconut in my pantry. Since I’m not usually a fan of coconut and the shredded coconut isn’t a regular pantry staple at our house, I’ve been looking for something else to make with all the leftover coconut besides simply making the German chocolate cupcakes again (which was tempting since they were pretty tasty).
And then I came across these Snow-Capped Macaroons on The Bitten Word made from this Food Network Magazine recipe. The cookies looked simple and delicious, and I already had the coconut so I was ready to go.
Too much coconut
Besides, I was inspired by all the snow we were getting in the Sierras and knew it would mean even more great skiing in the days to come. Jan and I already had a few good cross-country and downhill ski days in, and with all the new snow, I knew there would be plenty more in the future. Making cookies that resembled the snowy peaks seemed like the perfect way to welcome more snow.
To make the cookies, I beat egg whites until frothy, added sugar, chopped almonds, vanilla, salt, and the shredded coconut. Atop my new favorite kitchen tool the Silpat mats, I used a tablespoon to measure out the cookie mounds. Then, after dampening my fingers with water, I formed the mounds into little cones.
I baked the cookies until they started to turn golden brown at the edges. After cooling, I used a double-boiler to make the chocolate glaze, and slowly dripped the glaze over the tops of the cookies. Lastly, I substituted the recipe’s sugar crystals for decorating, and instead used some sea salt crystals sparingly (the reason for this was twofold: I didn’t have sugar crystals and didn’t want to go to the store, and secondly, I tasted the cookie and glaze and thought adding even more sugar would make the cookie overly sweet. Thinking back to a holiday potluck I attended in which one person made surprisingly tasty bars with only Lay’s potato chips and white chocolate chips, I thought these cookies could also benefit from the salty/sweet combination. As I was experimenting, I left half the cookies plan with no salt/decoration, and did the other half topped with a few sea salt crystals. I used friends and family to taste-test the cookies side by side for the next few days, with the salt-topped cookies the clear winner over the plain ones.)
Mountains of snow!
Chewy but with a firm but flexible chocolate crust on the outside, the cookies tasted as good as they looked. Jan described them as tasting like a Mounds candy bar, so I was pleased.
The next day, I took some of the cookies in my backpack for another cross-country skiing adventure. Jan and I departed from the Tamarack Ridge Trailhead, about 10 miles north of Shaver Lake in the Sierra National Forest. Because the snow was fresh, deep and powdery, it wasn’t long before the groomed trail ended, and then after that, not even the snowmobiles could traverse the trails. So, about mid-thigh deep in snow, we made the path that looped back to the trailhead ourselves, and it was certainly a workout. But being out in the forest, hearing only the sounds of snow crunching under our ski poles, the beauty and serenity we were able to experience was worth the work. When I remembered it was time for a snack, the Snow-Capped Macaroons were just the thing to keep us going for the rest of the miles.
I had my first paella when I studied a semester in Spain, but it wasn’t until Jan saw it prepared multiple times on Top Chef that he quickly followed suit and we enjoyed this delicious dish together, many years later.
By now, Jan’s a paella expert, and he’s got his recipe perfected. Because the ingredients are basically mixed together and left to cook, following the proportions of rice and broth are important in creating perfectly cooked rice with a creamy consistency.
The concept of the dish is simple, and yet it makes for a sophisticated presentation. I’m always wowed by the aroma, the deep yellow color of the rice, and the abundance of seafood that seems to always be spilling over the pan.
We’ve seen special paella pans marketed to chefs at cookware shops, but a large sauté pan with a lid will do the job equally well. We start by browning the chicken in the pan, removing, and browning onions, garlic and bell peppers. The rice is added, then the chicken stock, and placed in the oven to cook. After about 20 minutes, the chicken is added back on top of the rice, along with the other meat and seafood desired. We cook this another 10-15 minutes in the oven, then add the shellfish and pop back into the oven until they open up.
Step one, choose your pan and brown the chickenRemove chicken, brown peppers, garlic and onions, then add riceAdd broth, and then into the ovenGetting close!After the addition of the colorful clams
We like to serve the paella family style so we can ooh and ahh over the contents of the big colorful pan. Serve along with a simple salad, with bread and butter on the side.
*Saffron is an essential ingredient in this dish. It seems expensive but it goes a long way since you don’t have to use too much of it. It can be found at Whole Foods, World Market or online on Amazon.
Ingredients
½ pound boneless chicken thighs or breast pieces
½ pound large raw peeled shrimp
1 hot link (cut into ¼” pieces)
1 pound thawed frozen clams (I buy frozen pre-cooked clams found in most mega mart’s fish department)
1 medium onion (medium dice)
2 cloves garlic (chopped)
1 small red bell pepper
2 tablespoons olive oil
12 oz. long grained rice
3 cups chicken stock
1 pinch saffron*
Salt and pepper
Directions
Pre-heat oven to 375 degrees F.
Heat olive oil in a oven safe sauté pan with lid.
Season chicken with salt and pepper and sauté.
Remove chicken from pan and set aside, and in the same pan, sauté onions, garlic and bell peppers.
Add rice and sauté until translucent.
In a separate dish, warm chicken stock and add the saffron to the warm chicken stock. Pour over rice and bring to a boil.
Cover and place in oven for 20 minutes.
Add shrimp, cooked chicken and hot link pieces to pan and cook in the oven, (covered) for another 10-15 minutes.
Add clams and cook in the oven uncovered until clams have opened (approximately 5 minutes).
Back in June I wrote about making tamales with my dad (Time for tamales) and my reticence to tackle making them on my own. I’m pleased to report that over Thanksgiving break Jan and I finally made them ourselves without an expert looking on! After cooking all afternoon and into the evening, wondering how they would turn out, we tasted and they were a success! Read about the process in my first guest blog for Taste Fresno here: Thankful for Turkey Tamales.
Certain dishes hold an almost legendary status. Everyone probably has a different one that their grandmother, friend, or family member makes. They’ve shared their recipe with you, and yet, your attempts at recreating the original never quite turn out like they should. For me, this recipe has been hummus.
A few years ago, my dad got hummus down to an art. I’d only had restaurant and store-bought versions until he decided he was going to find out the secret behind great hummus. He found it – garlic, and it didn’t take long for us all to start chopping up carrot sticks and pita bread to enjoy it with. Soon, everyone was asking him to make up a batch for parties, bring some over as an appetizer, etc. He even bought a bulk package of these cute little disposable containers to put the hummus in he was giving so much away. And with it, he included the simple recipe on a yellow post-it note each time.
But it didn’t seem to make any difference. I tried to make it on my own, but it never turned out the same. Instead, I’d go over to visit and wait around until he suggested making some for me to take home.
Usually, this method sufficed, but with my dad on vacation, I couldn’t wait any longer for my hummus. I had to give it one last shot. This time, I followed the recipe like I thought I had before. And to my surprise it came out great!
I realized what had been happening in all those other attempts: I’d balked at the sheer volume of garlic in the recipe, and made my own modifications without really realizing it. This time, I squeezed the cloves of fresh garlic through the garlic press one at a time, and threw them all in. (I was desperate for some good hummus!)
The surprise result? It turned out just like dad’s famous hummus. He always swore that the secret was the garlic, but I think I was holding back, afraid of overdoing it. The garlic is needed to add some bite to the earthy flavor of the garbanzo beans and tahini (a paste of ground sesame seeds, available at Mediterranean food markets). And the addition of the sumac (another Mediterranean spice) gives it a rich, authentic flavor.
I got out some crunchy pita chips to enjoy the result: smiles served up with some serious garlic breath.
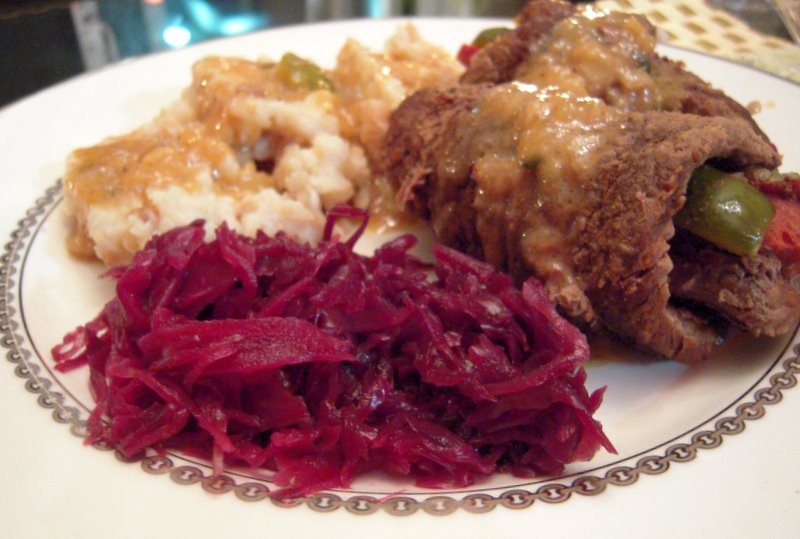
At home, the experimentation continues with sous vide, but thankfully on other nights, there’s been a stark contrast to the new age cooking techniques. We’ve been bringing back old world flavors. Jan has been working for some time to recreate some traditional favorites his Grandma used to make for him in the Czech Republic when he was small. The latest, and one of my new favorites in addition to the fried cheese (link here) is Ptacky.
Ptáčky (pronounced tach-key) is Czech for bird because the brightly colored sausage, pickle and mustard stuffed inside a piece of flattened beef resembles a bird, even though there is no bird in it. Once rolled, the beef is tied and cooked like a stew. Continue reading →
Growing up in Fresno, California, I took stuffed grape leaves for granted as staples at any deli counter. As a kid, I met them eye-level through the display glass with a mix of awe and suspicion. They might be considered a standard dish in many Mediterranean cuisines, but in my mind, all I saw was a dark, glossy green roll, delicately wrapped up and eerily finger-sized.
Depending on who you talk to, they can be called dolmas or sarmas, and the words literally translate to “stuffed things.”
I hadn’t thought about the dolma much until this year, when my daily drive took me past miles of vineyards on the outskirts of Fresno. With the top grape acreage of any county in the United States, that translates to lots of wine, raisin, and table grapes. And while Jan and I often find ourselves enjoying products made from grapes (with wine being the clear winner), there’s another product that comes from these grapevines that we often overlook, the leaves.
Jan has always loved stuffed grape leaves, and likes to try offerings at local markets and sandwich shops in search of the best. He’s even purchased canned stuffed grape leaves, though those left much to be desired. I’ve always found the briny taste of the grape leaves too overwhelming to enjoy them, so tackling this dish was a good challenge for us. And while I knew the results wouldn’t turn out like anyone’s grandmother’s, I hoped they might come in somewhere in between the canned version and the deli counter’s.
Start with grape leaves in a jar
I went to a Mediterranean market to purchase the grape leaves, which came in a large jar. The grape leaves had to be removed and unfolded carefully, so they would not rip. Because the grape leaves are soaked in brine, I rinsed thoroughly to remove as much extra salt water as I could.
Combining beef, lamb, rice, butter, water, and spices
You can get creative with stuffings, but the classic is rice and meat, and we chose a recipe that had a higher meat to rice ratio. We ground up cuts of beef and lamb in our meat grinder, and our ratio was about two-thirds beef to one-third lamb. The meat is mixed with uncooked rice, which will cook together with the meat once wrapped in the grape leaf.
Carefully wrapping
Rolling them was both fun and tricky, and I had to keep reminding myself that the stuffing would double in size while cooking. If wrapped too tightly, the grape leaf could break during cooking as the filling expands inside.
Served with beef and lamb meatballs, rice pilaf, and salad
We enjoyed them with a hummus appetizer, lamb and beef meatballs (made with the leftovers of the meat we ground for the dolmas), cucumber and tomato yogurt sauce, and rice pilaf.
And I must say that the stuffed grape leaves were a winner! The cayenne gave the stuffing a bit of a welcome kick, and the meat and rice was perfect, providing just the right balance to the flavor of the grape leaves. Serving with the yogurt dipping sauce took the dolmas up to the next level, and we will definitely be making these again. After seeing them come together from the inside out, I won’t be that skeptical kid at the deli counter anymore. In fact, I might even call myself a fan.
Carefully remove the grape leaves from the jar, unfold, and rinse thoroughly. Set aside. In a bowl, combine beef, lamb, rice, butter, tomato paste and salt. Add pinches of black pepper, cayenne, basil, and savory. The last ingredient to be added is the warm water.
Mix the mixture with your hands until combined, then let the mixture rest for a few minutes before rolling in the grape leaves. While the mixture is resting, line the bottom of a pan with grape leaves, to protect the stuffed grape leaves while cooking.
Carefully wrap about one tablespoon of stuffing with one grape leaf. Form a cylinder shape with the stuffing at the base of the grape leaf. Fold in the bottom and sides and carefully wrap into a roll. Place in the pan on top of the grape-leaf-lining, with the point of the leaf down.
Place the stuffed grape leaves atop a bed of grape leaves
Once you’ve used all your stuffing (this recipe makes about 20 dolmas), and filled the pan with a single layer of grape leaves, add enough water to cover them, along with about half a teaspoon of oil. Cook on medium heat for about 20 minutes, or until the rice is tender.
Cooking in water, which will boil away
While they are cooking, make the yogurt dipping sauce (see below). After about 20 minutes on the stove, you may have to sacrifice one to test if it’s done. The liquid should have boiled away and you will be left with shiny dolmas that are deeper in color than the uncooked versions.
When done, they're a deep, dark green
For the sauce, you will need about half a cucumber, 1-2 tomatoes, plain yogurt, and lemon juice. Peel the cucumber, cut in half, and remove the seeds with a spoon. Use a cheese grater to shred the cucumber, and place into a bowl. Add diced tomato, about 1 cup of plain yogurt, and about 1 tablespoon of lemon juice. Stir and refrigerate until ready to serve. Can be served atop the stuffed grape leaves or as a dipping sauce on the side.
This week Jan was hard at work perfecting the recipe for a different kind of cocktail, the Mexican style shrimp cocktail, and I was happy to oblige as taste tester. That is, after I had the first, delicious spoonful.
The reason for this: In the past, I was probably guilty of staring at one too many men in hole-in-the-wall taquerias who ordered shrimp cocktail. Not that I was checking these guys out, I was more in awe of what they were eating, and the very fact that they were eating it. Continue reading →
When I heard someone ordering a “skinny” margarita the other day from the bar, I had to stop and ask the bartender what exactly that was. I learned that it’s a margarita with margarita mix (or sweet & sour) replaced by club soda and lime juice.
Real Housewife Bethenny Frankel has even trademarked her version of this margarita as “The Skinnygirl.” But the basic principles are simple: mixers with no sugar and fresh fruit and liqueurs for flavor.
As I’ve been using club soda to tone down overly sweet drinks for a while now, I knew I’d like this less sweet version of the margarita, but I wondered if others would accept its less sweet taste.
I decided to do a side by side comparison of the skinny margarita verses the standard, with Jan as my second judge. After all, since he’s a guy who uses Coke, ginger ale, and tonic water as his main drink mixers, I could assume he’s less concerned about his sugar (and therefore calorie) intake than I am. So while I might be swayed to like something more because it’s healthier (as I did with the peach ice cream), he would be able to judge purely on taste.
But before making the margaritas, I wanted to share a couple of my drink-mixing tips. First secret: triple sec. This orange-flavored liqueur compliments so many different types of spirits and seems to magically neutralize the strong alcohol flavors of vodka, tequila, and whiskey (the bases of most drinks mixed at my bar). It’s a must-have for a well stocked bar, and you don’t need to go fancy with Cointreau.
Also, I don’t measure anything that goes into a drink; I always eyeball it or use a shot glass to get the correct proportions. For me, this makes drink-mixing more laid back and experimental, and opens up the opportunity discover and create new drinks by chance.
If I’ve got a good ratio/recipe down, I’ll use a shot glass for measuring, so my recipe measures amounts this way (keeping in mind that a standard shot glass is 1.5 ounces). You can buy a 1.5 ounce stainless steel jigger (sometimes also called a pony), but I always use a shot glass because it’s handy and easily cleaned in the dishwasher.
Fill glass with ice cubes and add tequila and triple sec. For the skinny margarita, fill the rest of the glass with club soda (it will be about 3 shots, or 4.5 oz. worth) and the juice of 2-3 lime wedges. Stir and enjoy. (Calories: 139. Sugar: 9 grams.)
For the standard, repeat the steps for the skinny, except replace the club soda with margarita mix. (Calories: 297. Sugar: 48 grams. This is using World Classics premium non-alcoholic margarita mix, with 200 calories and 50 grams sugar per 5.8 oz. serving.)
Results
I liked the skinny margarita because I could taste the tequila, helping me avoid the situation of slurping the drink down without realizing how much I was drinking (a very easy thing to do with many “girly” drinks). When sipping on the two side by side, it became apparent that the standard margarita was too sweet.
Jan’s vote was for a combination of the two margaritas: keep the measurements of alcohol the same, but use half club soda/lime juice and half margarita mix. I admitted that was a good compromise, and it did a lot to cut down on the often too-acidic nature of margaritas. But I’m stuck on what to call this margarita–the sort-of-skinny? (Combination of skinny and standard margarita: Calories: 218. Sugar: 29 grams.)
It’s official. I’ve gone overboard with the ice cream maker. Since stealing the machine from my brother-in-law, I’ve made banana ice cream, mango ice cream, vanilla ice cream, peach ice cream, and blueberry frozen yogurt within a two-week period. I feared this would happen (you can read about my attempts to postpone the inevitable in my first ice cream making experience here).
All this ice cream making comes with some lessons learned. See this conversation between me and Jan:
Anna: Try the fresh peach ice cream I made!
Jan: I really like frozen yogurt (said while taking a bite of peach ice cream).
A: What do you think?
J: It’s good. I like sherbet too.
A: But what about the ice cream?
J: Do you think you could make frozen yogurt? What about sorbet?
A: The ice cream! The ice scream!
J: It’s good.
A: Hmpf!
J: How do you make frozen yogurt? I used to love TCBY yogurt. I would get vanilla with gummy bears when I was a kid.
You can see things went downhill quickly. After I got over my bruised feelings and Jan and I were back to rational conversation mode, we determined that he was dissatisfied with the consistency of the ice cream, not the taste. In my efforts to make “healthier” ice cream with lowfat milk and half & half instead of cream, I ended up with a lighter texture ice cream. I thought it was pretty darn good, light and refreshing, in fact.
But Jan said when he hears the term ice cream, he thinks Häagen-Dazs. But I’ll need some extra-fat-fortified cream to end up with Häagen-Dazs creamyness and texture, I tried to explain to him, quoting from the Cuisinart product manual:
You may substitute lower fat creams (e.g. half and half) and milk (reduced fat or lowfat) for heavy cream and whole milk used in many recipes. However, keep in mind that the higher the fat content, the richer and creamier the result. Using lower fat substitutes may change the taste, consistency and texture of the dessert. When substituting, be sure to use the same volume of the substitute as you would have used of the original item. For example, if the recipe calls for two cups of cream, use a total of two cups of the substitute (such as 1 cup cream, 1 cup whole milk).
Jan said he thought the peach ice cream was good, but hearing the word “ice cream” had set him up for different experience than what he got. I see now why those clever marketers came up with the murky sounding “frozen dessert” label for lower fat frozen treats. So it’s all about the expectations you set. This recipe has been adapted from Cuisinart’s product manual, which features the creamy, full-fat recipe.
Peach “ice cream”
1 pint pureed fresh peaches
1/2 cup sugar 1 cup lowfat milk (I used 1%)
2 cups half & half
1/2 teaspoon vanilla extract
Peaches ready to go
Directions
Peel and slice peaches and process in a food processor, set aside. In a separate bowl, whisk the sugar into the milk until combined. Add the half & half and vanilla extract and combine thoroughly. Pour the mixture into the ice cream maker and turn on, leaving for about 20 minutes.
Pour the peaches in during the last five minutes of processing in the ice cream machine (and don’t forget about it like I did here or it will probably overflow). Ice cream will be of soft-serve consistency, and for harder ice cream, freeze for several hours in the freezer. Note: because of the lower fat content, once the ice cream has set in the freezer, it will need to sit out on the countertop for about 10 minutes before serving to become scoopable.
Don't forget to set a timer
Coming soon: blueberry frozen yogurt (and yes, Jan liked it!)


